


ArchiTerra 3

ArchiCAD plug-in for terrain modelling. Description
Characteristics
- the plug-in itself
- the dedicated library directory
- the manual, accessible directly from ArchiTerra help.
Work method
This mesh is totally compatible with ArchiCAD meshes and of the same nature, but with many more additional functions.

At this point, the mesh is processed and the parameters of the colours and different materials for the Map, Section/Elevation and 3D views are assigned.
Let's now take a rapid look at the many possibilities ArchiTerra 3 provides to enrich the elements on the terrain model.
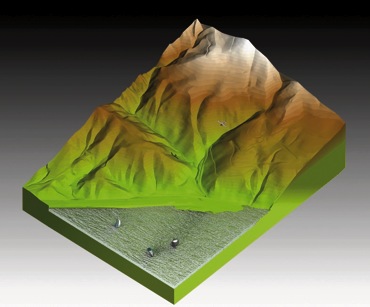
 As well as the usual functions to automatically create basins of water on the mesh reaching up to the altitude indicated, personalise the colours of a number of areas (even if superimposed) of terrain and rapidly construct buildings (with hip roof) for an urban fabric, ArchiTerra 3 also offers a new tool to randomly generate trees, rocks and terrains to enhance the project with diversified natural elements.
  We will not linger on the Wall and Retainer Wall tools, but these too are completely editable, including in 3D view, and the retainer wall, as well as having a configurable cross-section, enables excavations to be limited in space as happens in real life.
  The tools depicted here are used to calculate the volume of terrain moved on the original mesh, to unlink from the mesh the elements involved in its modification in order to restore the conditions prior to the modification, to modify the display of the layers ArchiTerra 3 creates to manage the dynamic Boolean operations and to modify the axes involved in shifting the nodes of an element (useful in the 3D view).
These tools are extremely useful in managing the model and are described in detail in the manual.


ArchiSuite System Requirements
The add-ons require the same configuration as your version of ArchiCAD.
- After downloading, click on the file and an Installer will put the Add-Ons in the correct folder of ArchiCAD
- After the Installer finished, it is necessary to prepare the Cigraph-Dongle. Put it into the computer and lunch ArchiCAD. From the menu: Design- Extradesign select “Cigraph Liccenze Activation” and follow the instructions.
ArchiSuitePlus download must be related to the ArchiCAD version and Operative System in use.
To ease your life we developed a dedicated "Installer", which starts after downloading ArchiSuitePlus.
ArchiSuitePlus
| ArchiCAD 20 | 23 November 2016 |  |
 |
| ArchiCAD 19 | 23 November 2016 | |
|
| ArchiCAD 18 | 23 November 2016 | |
|
| ArchiCAD 17 | 23 November 2016 | |
|
Updates and bugs fixing
ArchiSuitePlus for the current and the previous ArchiCAD version are constantly up to date, as soon as new new bugs arise. When you launch ArchiSuite, it immediately advises you for new updates available for free download.
Remember to quit ArchiCAD, before installing any ArchiSuitePlus Update.
Back to:
Actual Plug-ins Collection:
- ArchiTerra 3
- ArchiForma 2
- ArchiTiles 2
- ArchiTime
- ArchiStair 2
- ArchiPanel
- ArchiMap
- ArchiQuant 2
- ArchiGiallieRossi
- ArchiTools
More info about: